Wednesday, 19 January 2011

Deck going on

The first length of deck on the starboard side is bonded and glassed in place, cut from template, as Guy mentioned in an earlier post: The fit was not perfect!!! The aft and fwd sections are a good fit. The middle section needs re-making.

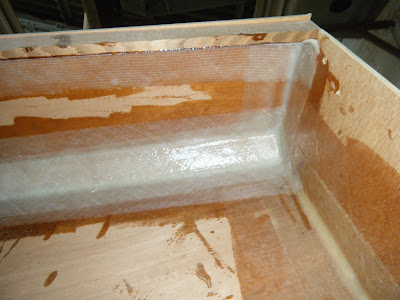
A bit of a mission getting under the deck to bond and glass (below) but I did manage with a little swearing etc! As mentioned in one of my last posts, 2 more layers of glass holding the deck to the chamfer, staggered. Inboard end (deck to Cedar batten) a single layer of glass, and single layer under deck to bulkheads join. The pic below was taken looking upwards.


A little planing and sanding and it's all smooth, ready for some filler.

So (as below) I have a long way to go with more swearing. Hoping to get the next (middle) section prepared later today and bonded etc in the next few days. Then to repeat the whole process on the port side.

More posts and photos when the deck is on completely. Might start to look like a boat then.


Another BABY!

This time it belongs to Guy and his partner. Born early Saturday morning 15/01/2011, so I guess I'll not be seeing him here to help me then?

Congratulations to you both (+ 1).

Photos on starting to bond the deck down to follow.......

Tuesday, 11 January 2011

Deck Chamfer

Guy has given me the templates for the deck chamfer. One full sheet of plywood was used, cut into 250, 200 and 150 mm wide pieces. Once joined with with filler and a layer of glass each side the template marked out and the plywood cut, planed fair and sanded. The join this time was scarfed as the chamfer pieces are only 50 mm wide. A router was used for the scarf.

Again 'stitch and glued' into place, cable ties and a small fillet of glue yesterday to hold until the cable ties could be removed. Today a bigger radius fillet and the glass on the port side done. If time etc permits: STB side tomorrow.

We glassed from the top of the chamfer downwards and then peel-plyed. The plan is to then glass from that join upwards to the underside of the deck when that goes on (which is the next job as I have already cut them) And for the sake of it another layer of glass over the lot as this will be the most likely area of impact. Should that happen!!!!
As the first picture shows, the join between the hull and chamfer timber is pretty close, only very little filling is required before fairing. Some of the areas on the hull needed a little 'pulling and pushing' whilst cable-tying to get a fair join. All-in-all it's looking good!

Friday, 7 January 2011

Round the Bend


As mentioned in the last blog we have cut in a strip of cedar to define the cockpit deck joint. The strip is continuous and let into the bulkheads. I will update the plans to reflect this and the bulkheads can be cut with this notch when loftng/CNCing the bulkheads; this way the strip will just drop in. You can see how the removal of the coachroof bulkhead has aided this process.

Gerry is at the boat today doing the hull to deck joint. He is using plywood from a printed template that I have provided; it is a developable suface (one degree of curvature) and should fit exactly. However, I am contemplating using the same size strip of cedar at the chamfer (minor mod required to the drawings) as this will again allow this very visible part of the boat to built fair as well as the providing a stiffer corner for the plywood to butt up against before taping.
The side decks have been butt joined together and are ready to go on. We used the exact same method as we did when making the hull planks. We have offered them up to the boat but the fit does not appear perfect; it seems there is too much curvature in the deck for the computer to produce an exact developed surface. We shall see what fun we have when it comes to putting it on for real(!) but I think the best way to proceed is to remove as much deck camber as possible from the design so we know that a pefect fit can be achieved from the patterns. After all the aim must be to produce a pack of plans which fit together with as little modifaction as possible.

Cut 'n' Shut

Thank you for all the emails since the last post. As promised we are back (well mainly Gerry) on the case. We are making a few changes to the build process as we go along; this is the prototype after all!


The first thing we did is remove part of the coachroof bulkhead. We will almost certainly build this as a seperate item later (the overall look of the boat will remain the same). This will also make the build a little easier - see the next post. We have also added a few intermediate ringframes. The boat is going to be much stiffer than it needs to be but it will mean that we do not have to worry about any deck beams now, especially as we intend to add stiffness to the deck with a layer of glass and foot chocks. You can also see in the photo a piece of cedar strip in way of the side deck to cockpit resting on some temporary cross beams. We feel this is the quickest, easiest and fairest way to finish this corner. We may even be able to get a nice little rad on the corner for comfort!!